Today's plan: let's start from a regular, single-camera, RGB smartphone picture and separate the background from the picture's content using a pre-trained segmentation deep neural network.
Recipe difficulty
- Statistics: 🔥 - no statistics, and we won't talk about the model itself.
- Technical: 🔥🔥🔥 - even though we don't train the network, we need to deploy it and do some image manipulation, which is prone to issues.
- Time required: 🕜 - it took me a couple of hours to write.
What it is
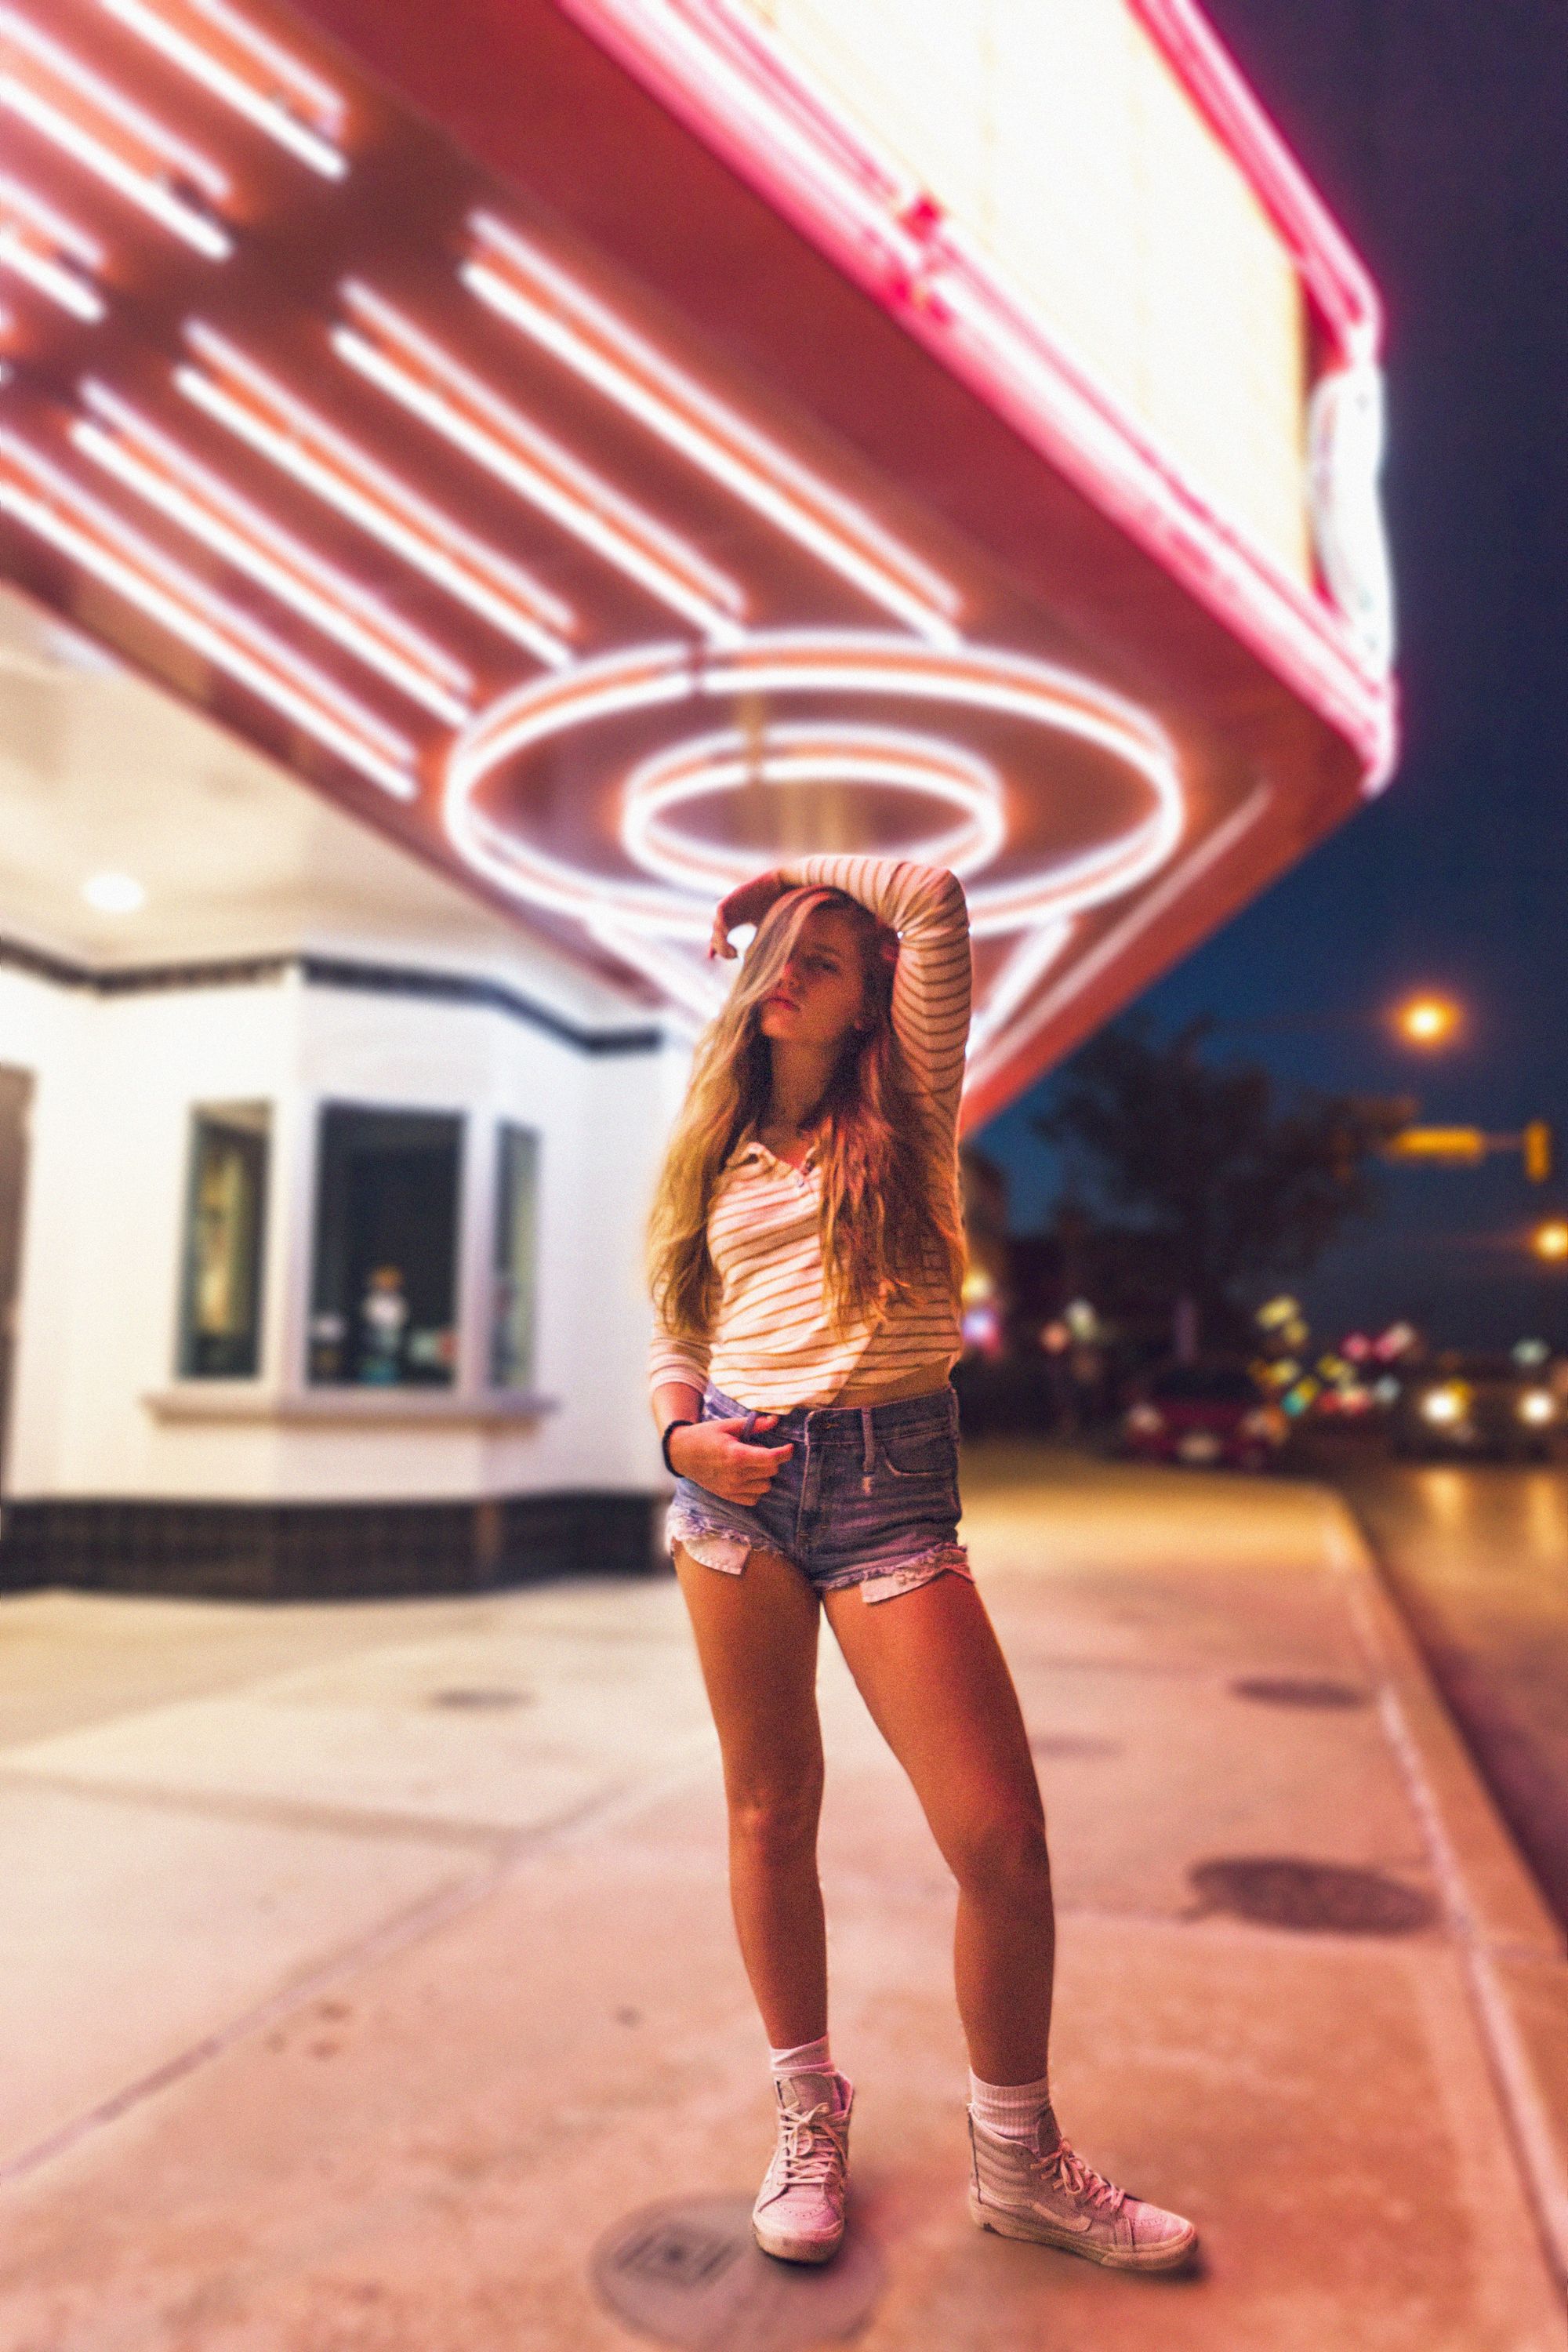
You know when you take a portrait picture with your iPhone and suddendly it looks all professional, like this?
This blog post carries a short proof of concept showing you how the sausage is made.
Why is it useful?
Smartphone photography is bridging the gap between small-sensor cameras and full frame sensors not just thanks to advances in the sensors and lenses themselves, but also thanks to much smarter post-processing.
As a photographer I'm incredibly stoked to have such a powerful technology in my pocket with me all the time. We really are living in the future. But how can we replicate this effect at home?
Modern phone use three main ways of defocusing the background: time-of-flight sensors (think Kinect) build an accurate 3D representation of the environment, which is then converted to a depth-map and used to blur the background. Multi-camera shots use points-of-interest and calculated parallax to do the same with regular RGB sensors. Single-sensor phones, on the other hand, have to rely on a semantic representation of the world in the picture.
If we're going to follow the third method, we'll need one such representation. Luckily, while segmentation models are quite advanced and difficult to train, there's a lot of models with pre-trained weights available. For this post we're going to use Matterport's implementation of a Mask-R-CNN.
First, let's clone the repository on a local folder. Before we proceed to installation, we'll need (at least on my machine) to do two pre-processing steps which are inelegant and clunky, but necessary:
- install shapely in a pre-compiled distribution:
conda install shapely - remove the following lines from samples/coco/coco.py:
from pycocotools.coco import COCO
from pycocotools.cocoeval import COCOeval
from pycocotools import mask as maskUtils
once you've done so, you can proceed to the actual installation:
- install the required dependencies:
pip install -r requirements.txt - deploy the actual project:
python setup.py install - download the model weights (mask_rcnn_coco.h5) from the official distribution and place them in the repo root folder (should be Mask_RCNN-master)
Now you can just fire up your trusty Jupyter Notebook and start working on this awesome proof of concept.
The basic idea is as follows: we'll use the Mask-R-CNN to generate a segmentation (mask) of our portrait subject; we then generate a blurred version of the picture, which we superimpose to the original picture based on the mask.
Let's start with the model setup:
import sys, os
import numpy as np
import skimage.io
import matplotlib
import matplotlib.pyplot as plt
%matplotlib inline

ROOT_DIR = os.path.abspath("your/path/to/Mask_RCNN-master")

from mrcnn import utils
import mrcnn.model as modellib

sys.path.append(os.path.join(ROOT_DIR, "samples/coco/"))
import coco

class InferenceConfig(coco.CocoConfig):
    GPU_COUNT = 1
    IMAGES_PER_GPU = 1

config = InferenceConfig()

COCO_MODEL_PATH = os.path.join(ROOT_DIR, "mask_rcnn_coco.h5")
MODEL_DIR = os.path.join(ROOT_DIR, "logs")
After this initial step, in which we have pointed python to the correct folders, we can actually initialize the models using the pre-downloaded (pre-trained) weights:
model = modellib.MaskRCNN(mode="inference", model_dir=MODEL_DIR, config=config)
model.load_weights(COCO_MODEL_PATH, by_name=True)
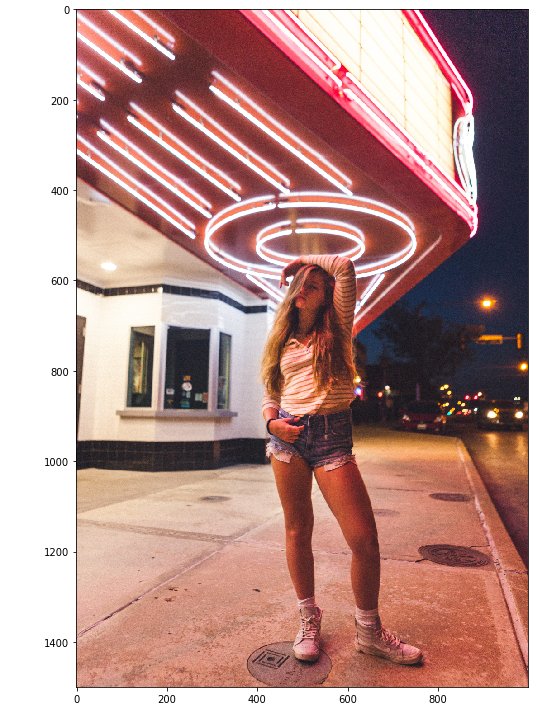
We can now load our single-shot image using the fantastic scikit-image library. The image must be loaded as a 3-dimensional array of integers between 0 and 255 (RGB); we will resize it to be 1500-px high:
HEIGHT = 1500

image_or = skimage.io.imread(os.path.join(ROOT_DIR, "images/test_image.jpg"))
image = skimage.transform.resize(image_or, (HEIGHT, int(image_or.shape[1]/image_or.shape[0]*HEIGHT)))
image = np.uint8(image*255)
plt.figure(figsize=(10,5))
skimage.io.imshow(image)
plt.show()
We can now try and segment this picture using the pre-trained model:
masks_found = results[0]['masks'].shape[2]
mask = results[0]['masks'][:,:,0]

if masks_found > 1:
    fig, ax = plt.subplots(1,masks_found, sharey=True, figsize=(15,9))
    for i in range(masks_found):
        ax[i].imshow(masks[:,:,i])
    for axes in ax:
        axes.axis('off')
    plt.tight_layout()

else:
    plt.figure(figsize=(10,10))
    plt.imshow(mask, cmap='bone')

plt.show()
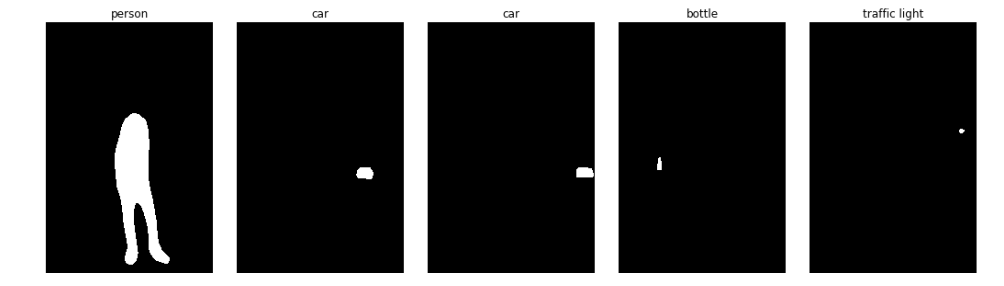
Note that the model is able to identify multiple masks (objects) per picture - you can use the COCO id dictionary to discriminate between detected objects. clearly we're interested in the first mask (masks are ranked by the model's confidence in them). Hence why we use the following to select the first mask:
mask = results[0]['masks'][:,:,0]
Now we need to generate a blurred background image. We can do so using PIL, a powerful image manipulation library:
from PIL import Image, ImageFilter
image_bl = Image.fromarray(image).filter(ImageFilter.GaussianBlur(radius=5))
image_bl = np.array(image_bl)
plt.figure(figsize=(10,5))skimage.io.imshow(image_bl)
plt.show()
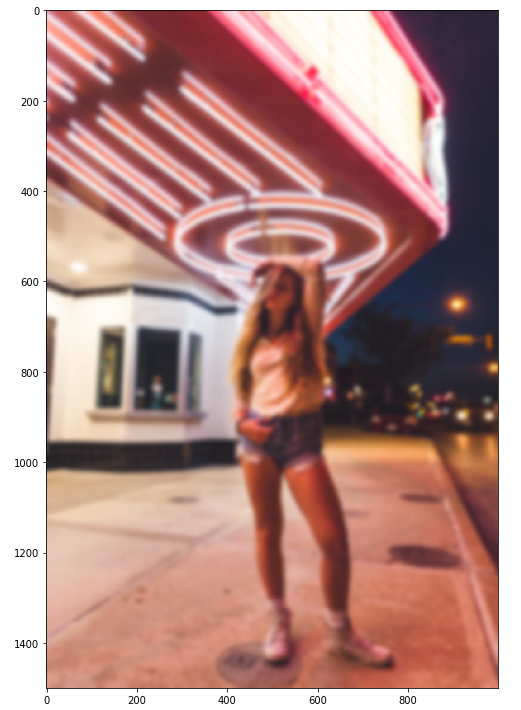
Note that in a modern implementation, we'd want to create a more natural-looking blur - for instance by taking the max of a heavily blurred gamma-corrected image and a regular image with a lower blur disc factor. Since I don't have time for this, I'll just do a regular blur implementation.
Finally, we blend the background and foreground picture using the alpha mask generated by the network:
mask_bl = Image.fromarray(np.uint8(mask * 255) , 'L')
mask_bl = mask_bl.filter(ImageFilter.GaussianBlur(radius=4))

image_comp = Image.composite(Image.fromarray(image), Image.fromarray(image_bl), mask_bl)
image_comp = np.array(image_comp)
plt.figure(figsize=(20,10))
skimage.io.imshow(image_comp)
plt.show()
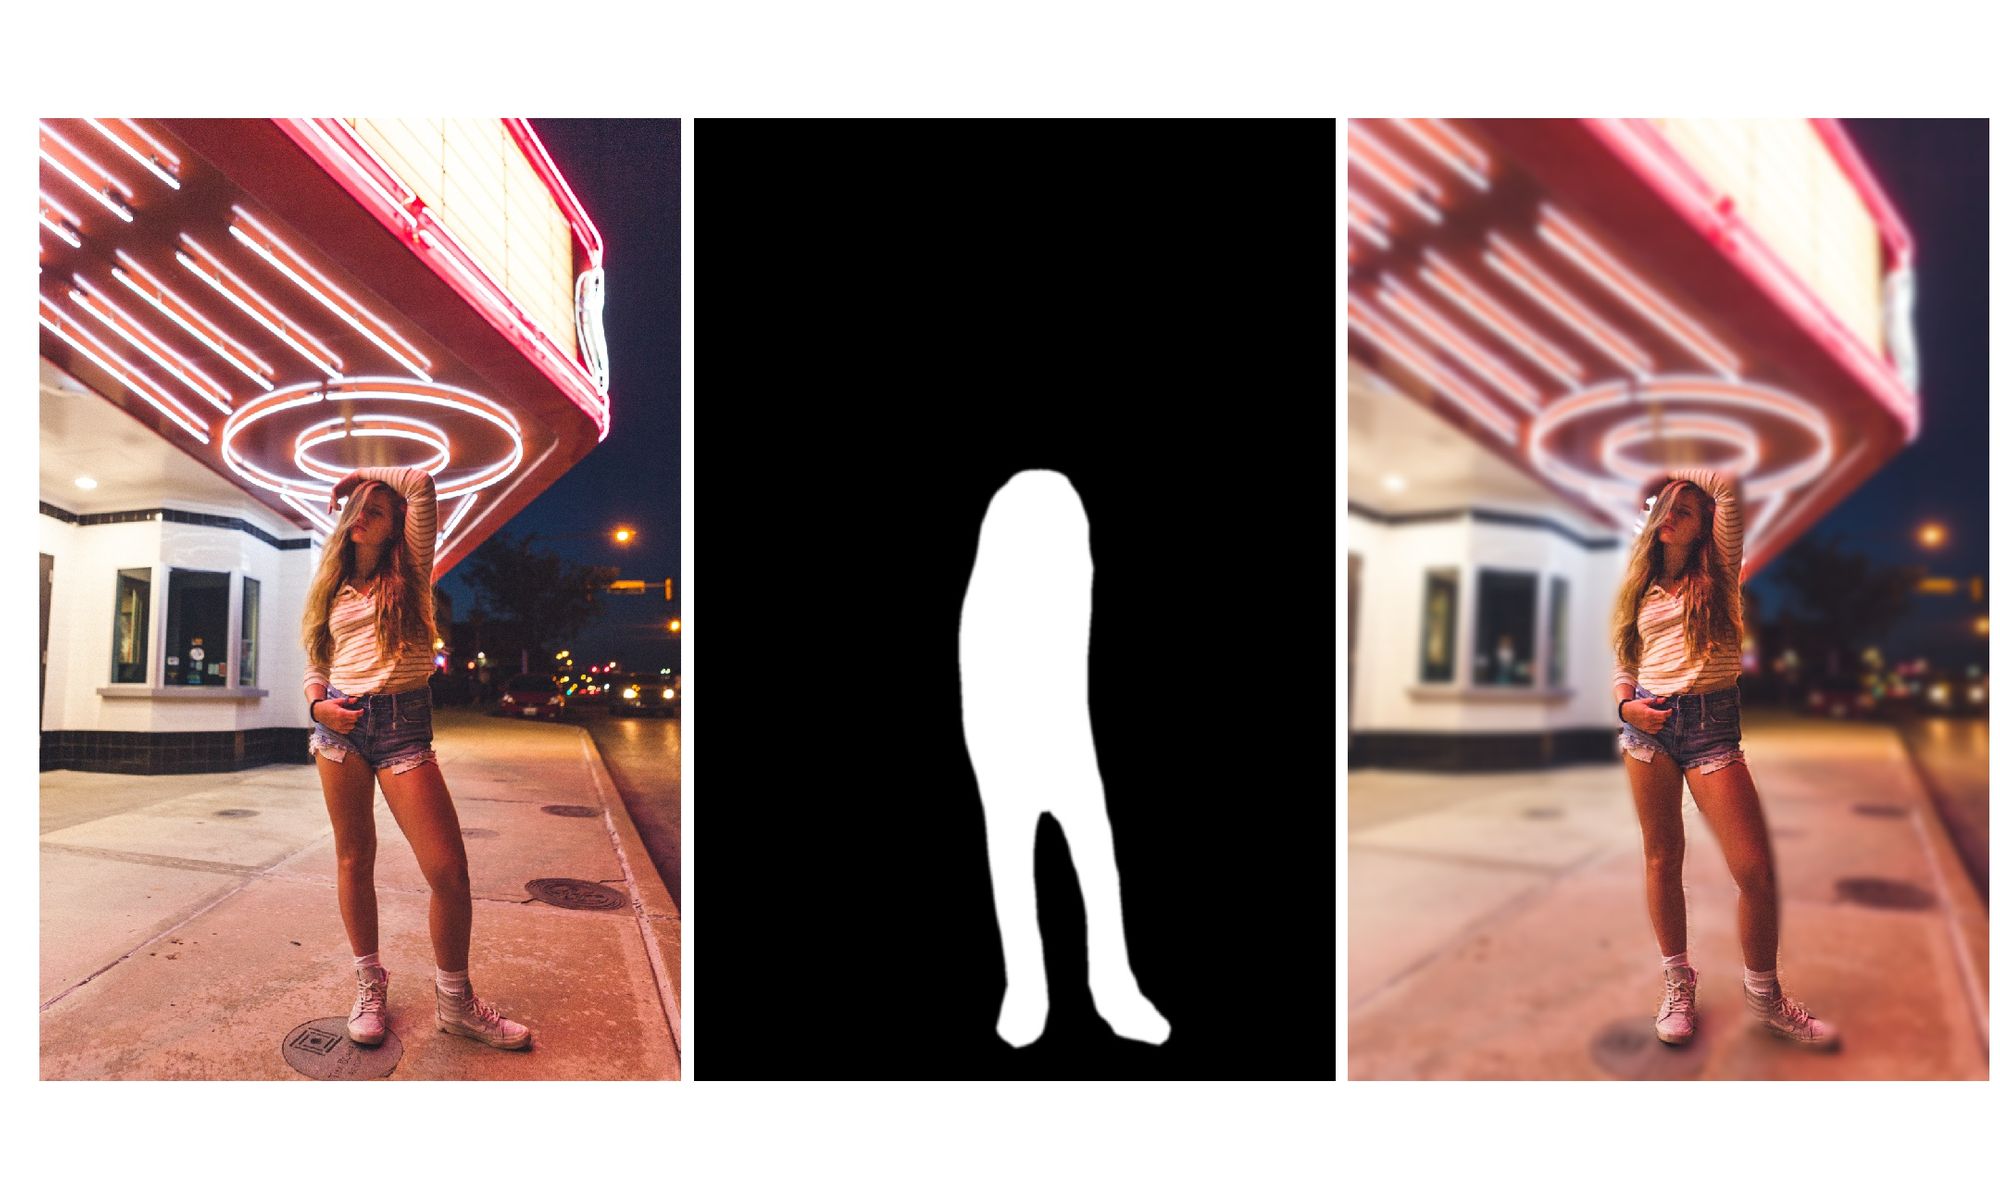
And here we are. This is more or less how it works. Using a more mature/interesting implementation of the background blur, and tweaking the alpha mask slightly in an image editing program we can get some interesting results with minimal effort.
Is this the future of photography? Personally I believe it's still difficult to emulate a real lens+sensor, and besides I love taking pictures with a full camera. But sometimes the crazy photo opportunities arise when you least expect it - and for that, a phone is probably the next best thing.