This technical entry covers the pretty involved process of rolling out Spark, Hadoop and Pyspark on a Windows machine.
Prerequisites

Your bucket list starts here! To run Spark on your machine, you'll need:
- A decent computer (ideally 8 cores and 32 GB ram, although 4/16 is fine too)
- Apache Spark, which you should download from the official website.
The usual conundrum: which version to choose? I went for a stable 2.2.3, but obviously if you go through all this trouble you should just pick the most recent one.
Also, do pick the version pre-built for Hadoop 2.7 - Hadoop, obviously, version 2.7 from the official site
- Java, the most popular programming language ever. You need this to run the Scala interpreter, which in turn interprets Pyspark. Nice! Download from the site - given that we are installing on Win and you probably have a large amount of RAM available, pick the x64 version for Windows.
- Scala, which is Spark's main language. Download it from here!
As for the version, anything higher than 2.10 goes. You need to get the Scala binaries for windows - no need to get tangled in with SBT. - Winutils bin folder, which you can download it from here. This is just a windows compiled binary for Hadoop - not needed on Linux, but obviously we're in Windows territory now...
Once you have all six items, we're ready to roll!
Installation
Java
This is the easy part. Start by installing Java. After you're done, you should open a command prompt shell (⊞ Win + R and type 'cmd') and check you have succeeded by typing:
java -versionUnfortunately, Java is a harsh mistress - so this probably won't work. That's because, unlike in unix-based systems where you can just use export, in Windows you need to manually set your environmental variables. To do this, you can use setx from the command prompt, but mistypes will probably cause a large amount of tears. Better be a noob and use the GUI like I do:
So go to control panel>system>advanced system settings>environment variables and click on 'new' for the System Variables. Easy! You see this:
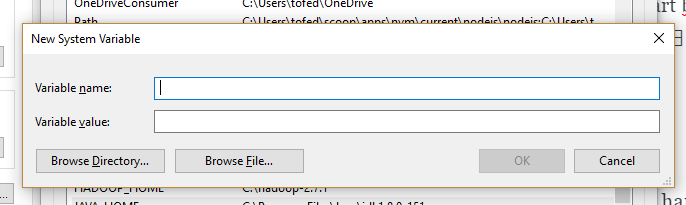
And what do you type in?
- Variable name: JAVA_HOME
- Variable value: C:\Program Files\Java\jdkXXX
Obviously you need to replace XXX with the correct folder name - in my case it's jdk1.8.0_151 , but it obviously depends on which devkit version you downloaded and installed.
Scala
Now, time for Scala: click on the installer, and then on next until you're done. Boy, it's easy. Once again, you'll have to set the environmental variable for Scala if the installer failed to do so.
- Variable name: SCALA_HOME
- Variable value: C:\Program Files (x86)\scala\bin
But wait! Why are we in x86 instead of just the regular (x64) Program Files folder? No idea, but I can confirm Scala is able to allocate the full memory space on my machine. Your mileage may vary.
Spark
You don't really install Spark - you just decompress it in a folder on a location you like. Since I'm a bad person, I just unpacked it on the main drive and left it there.
An important note here is that, if you unpack it in a folder that contains spaces, you will get all kinds of nasty bugs one page down the line. Just be grateful I found this out for you, and just remove all spaces :)
I called my folder spark-2.2.0-bin-hadoop2.7 , so let's make the assumption from now on that you have a folder like this:
C:\spark-2.2.0-bin-hadoop2.7 If you want to place it elsewhere, or name it differently, that's fine - just make sure you update it in the tutorial as well.
Once again, don't forget to set your environmental variables :
- Variable name: SPARK_HOME
- Variable value: C:\spark-2.2.0-bin-hadoop2.7\bin
Hadoop and Winutils
Similar story: just decompress the Hadoop folder in a location you like. I put it on C (don't judge me), and so we can all assume I have a folder like this:
C:\hadoop-2.7.1 Before setting the env variable, make sure you replace the entire bin folder with the one you downloaded from the link above. If you don't do this, this is all quite pointless, so please don't forget. It's a simple surgery: delete the existing bin folder in C:\hadoop-2.7.1 (or wherever you put your Hadoop), and drag and drop the downloaded bin folder in its place.
Finally, set your environmental variables:
- Variable name: HADOOP_HOME
- Variable value: C:\hadoop-2.7.1
Finishing touches
You now should add the env variables to your Path, if you haven't already.
This means you will need to edit the Path environmental variable.
Do not delete or create Path, as this will mess with a plethora of other softwares you might have installed, and since it gets stored in the Windows Registry, clicking without thinking will have you crying in no time.
You just edit Path. You just double-click it:
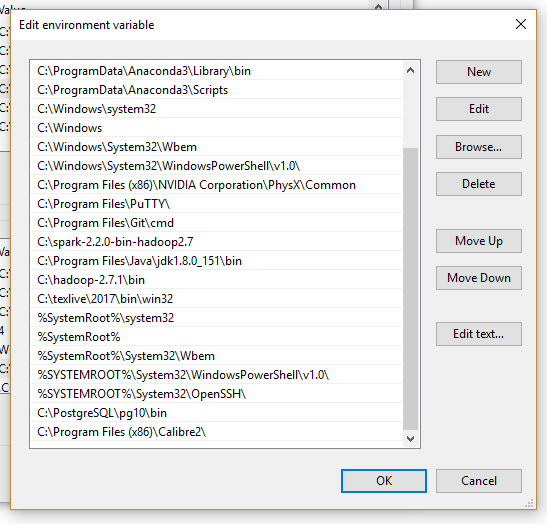
Now click 'New' - you can add these three entries:
- C:\hadoop-2.7.1\bin
- C:\Program Files\Java\jdk1.8.0_151\bin
- C:\spark-2.2.0-bin-hadoop2.7
Please remember to give these three bad boys the correct names and filepaths you used on your machine.
Testing
So, is it working? Maybe. Luckily, it's easy to check. Just open your trusty command prompt and type:
%SPARK_HOME%\spark-shellAfter some scary warnings, you should see this:
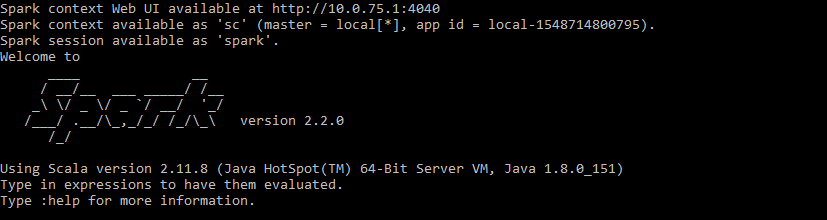
Welcome to the matrix!
The more unlucky amongst you, will not see 'Spark context available', but rather
Error initializing SparkContextor something similar. No SparkContext means no Spark, so let's fix it using Winutils, which we downloaded previously and placed in our Hadoop folder.
Create a folder called C:\tmp\hive (if you have decompressed Hadoop on C, otherwise adjust the location accordingly).
Now open your command prompt and type
C:\hadoop-2.7.1\bin\winutils.exe chmod 777 /tmp/hiveThis makes the scratch directory writable by everyone, including your Spark process. Why this could't happen manually, I don't know. But hey, it's fixed now. Re-boot the spark shell. All's well in the world.
You could stop here, but obviously we'd like to know how to use this magic, and even better- how to use it from your trusted Jupyter notebook. Read on!
Booting up Spark
For Spark to really be worth its while, you'd need to run it on different clusters. There's scripts in your sbin directory in the Spark directory (like start-all.sh) which help with that, but require some additional configuration.
But chances are, you only have one computer at home. No worries! You can easily create a master like this:
cd %SPARK_HOME%

bin\spark-class2.cmd org.apache.spark.deploy.master.Master
If all goes well, you will get an IP for your master as well as a local status webpage you can check. For me, for instance, the local webpage is on 10.0.75.1:8080, and the spark master on spark://10.0.75.1:7077
You now have a master - but no workers! To fix that, just open a command prompt and deploy a single worker, using one core and 4 GB of ram:
cd %SPARK_HOME%

bin\spark-class2.cmd org.apache.spark.deploy.worker.Worker -c 1 -m 4G spark://YOUR_IP_ADDRESS:7077
Obviously, the IP used should be the master's IP.
Additionally, you have some more parameters:
- -i IP, --ip IP IP address or DNS name to listen on
- -p PORT, --port PORT Port for service to listen on (default: 7077 for master, random for worker)
- --webui-port PORT Port for web UI (default: 8080 for master, 8081 for worker)
- -c CORES, --cores CORES Total CPU cores to allow Spark applications to use on the machine (default: all available); only on worker
- -m MEM, --memory MEM Total amount of memory to allow Spark applications to use on the machine, in a format like 1000M or 2G (default: your machine's total RAM minus 1 GB); only on worker
For more, read the docs.
And here we are!
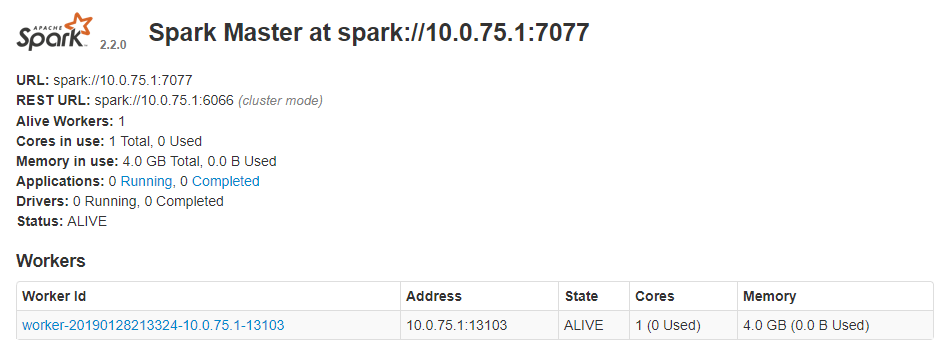
You now have one master, and one worker. Obviously, you should spin up a couple additional workers, using the same procedure as the first one.
And now for the pièce de resistance: how do we run code? We can do so using the shell (spark-shell -master spark://IP:PORT), but even better - we can do this from a regular Jupyter Notebook!
Using Pyspark
This is the easy part. I will assume you are using either virtualenv or (better) Conda. Easy does it:
pip install pyspark==2.2.0

pip install findspark
It is very important that your pyspark version matches the spark version you installed (mine is clearly 2.2.0)
Findspark is an incredibly useful item to have as well, as it automatically finds your spark bin
And voilà, we're ready. Just fire up your jupyter-notebook (making sure you're in the right environment and you fired up the right kernels - nb_conda can help if you're not on virtualenv)
Now you just:
    import findspark

    from pyspark import SparkContext, SparkConf

    findspark.init('C:\spark-2.2.0-bin-hadoop2.7')

    conf = SparkConf().setMaster("spark://10.0.75.1:7077").set("spark.executor.memory", "4g")

    sc = SparkContext(conf = conf)
And off you go! You can now use sc as the sparkcontext to do whathever your heart desires.
Surprise me!